Search This Blog

Sunday, June 30, 2013

Gleaning


It's always amazing how much stuff there is out there that nobody wants or has fallen off a truck.

A few weeks ago we picked up a discarded 4 draw steel cabinet which didn't take much to patch up and now is like new. It came in handy in the Cave to tidy up some things that were looking for a good storage place. In particular our seed collection was in a long wooden box on top of one of the fridges. It was always a bit awkward to use because of its size and location. After inserting some partitions in the top draw of the filing cabinet the seed packets went in there in alphabetic order. There was also an opportunity to cull any seriously out of date or unwanted packets. How much easier it is now to grab a packet of seeds and head out to the garden.

Seed Draw


Recycled Filing Cabinet
Some of our finds have included two small chicken tractors which are now used to relocate broody hens or a isolate a breeding pair. This week we picked up a very good quality heavy duty tie-down. My current push bike was dumped on the side of the road and has served well for a number of years. The BBQ (our first) is someone’s reject which just needed a good clean and a gas bottle.

Useful Tie down


A little rough but serviceable.


Not Pretty but free and useful


A couple of hours work and it was spotless

Our collection of wheel barrows has grown, we now have four and one in pieces in reserve. Always a handy item when one has a barrow devoted to firewood and another in the garden with weeds there is never a problem grabbing one for another urgent job.

Fully refurbished

Spares
 

In the workshop there is an endless supply of steel bits and pieces put aside for that unique job. A lot of the steel components come via the local tip shop. Especially heavy duty, galvanised large size steel pipe which we now have enough of to rebuild the 200 metre front boundary fence using these as the steel strainers and stays.

Future Strainers

Useful Bolts
 

All the automatic door closers in the house have been replaced with high quality commercial grade closers at no cost.

The list of acquisitions seems endless. Sometimes when you come across an item you think aha that will fix x other times it's “that could be useful down the track”. The worse case is that it can all be recycled if you suddenly get that “am I becoming a hoarder feeling”.


Another free steel cabinet for storing rat attracting paperwork
Collection of steel componentry at the ready
 

Jean-Francois Millet's painting “The Gleaners” is probably not the best parallel as it depicts grinding rural poverty whereas saving someone's discard for another use (rebirth) renders a value and appreciation on the effort to manufacture that item originally. It also elevates from the waste that can be so polluting.

Believe it or not this exercise machine was a "free if you remove it" offer. It gets a good work out now. And in the background is a free to good home wooden cabinet storing bits and pieces in a vermin proof environment.


Saturday, June 29, 2013

Chainsaw - Electric Start


Some time ago we were given a small chainsaw by a neighbouring farmer because it wasn't working well i.e. the chain brake would engage as soon as any load was applied. It was one of those cheap Chinese models that they give away with bulk purchases of farm products. Fixing the brake didn't take long and it turned out to be quite a good saw.

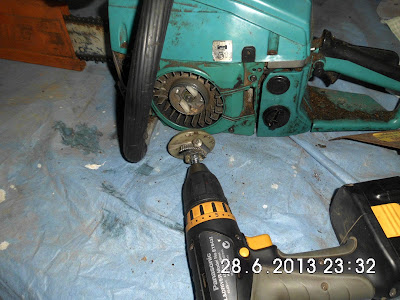
However we were warned that these cheap items don't last long and you can't buy spare parts. The latest problem was the starter cord mechanism which broke into two pieces. After much fiddling with alternatives and a long think, the solution came in a dream (well not quite but I was in bed). A modification to the pulley mechanism adding a shaft (in this case a small bolt).

The result is an electric start chainsaw i.e. using a cordless drill attached to the modified starter, the mechanism is inserted into the chainsaw and the drill run in reverse and bingo the saw starts and the mechanism withdrawn.

The only critical thing to remember is to have the chain brake ON until both hands are back on the saw.

That has delayed the outlay for a new chainsaw a bit longer.

Detachable Electric Start

Friday, June 28, 2013

Vinegar

Vinegar is a useful product. An ideal additive to Olive Oil in a salad, a preservative and flavour enhancer for bottled vegetables or an additive to your favourite cleaning product if not the cleaning product.

We use red wine vinegar or sherry vinegar for salad dressings, White wine vinegar for cleaning solutions. We used to make Apple Cider vinegar but now keep the apple cider for drinking instead.

Vinegar is simple to make all it takes is time. Our preferred receptacle for manufacture is the two litre flagon. Any red or white wine which has gone off in our household is put to one side for vinegar (some might question if there is ever a time when wine is undrinkable). To start off for the first time it is easier to use a small amount of bought vinegar just to speed up the process – better if it had not been pasteurised. Put about a litre and a half of wine in the flagon and add some vinegar. Leave the level well down the neck so it has the maximum surface area. Stopper the top with cotton wool and leave alone. Aerating the liquid by transferring it from one container to another about once a week or month will assist. After a few months taste to see if it is vinegar. It is possible to smell the difference between the finished product and one that still has time to go.

Eventually you may see a big blob of slime like material form on the surface (doesn't always) – this is a good indicator that you are on the right path. Keep this blobby slime in the flagon. The slime is called "The Mother" and is just a by-product of the process and is best kept to aid in the conversion process. It is not a bad thing. When the vinegar passes the taste or smell test decant about two thirds for use and add back more wine for ongoing conversion. Stating the obvious but keep white wine for white vinegar and red wine for red vinegar and sherry for sherry vinegar.

Two faults may occur. The first involves grubs breeding in the vinegar which is caused by not stopping the top well with cotton wool. They will create a vinegar with an awful smell which is best disposed of. The other main fault is an ethyl acetate (i.e. nail varnish) nose which is part of the conversion of alcohol to ascetic acid. It is only a few molecules per million but is very pronounced. By decanting the flagon regularly and incorporating lots of air the molecules will dissipate and smell disappear in time.

We keep about a 5 or 6 flagons going at any one time stored at the back of the laundry out of the way and bottle a few 750 ml bottles at a time. The vinegar continues to develop in the bottles and if cloudy at first will eventually fall clear naturally.

Citrus Cleaner Recipe.
Take half a dozen pieces of citrus, cut up finely and cover with water , boil until the fruit is soft. Strain and then discard the pulp. Add white wine vinegar to the citrus liquor in equal parts. Add enough drops of scented oil ( e.g. Eucalyptus, Tea Tree etc.) so that a thin film forms on the surface of your storage container. Ready to use.


Salads.
An interesting way of incorporating vinegar into a salad rather than adding it to the oil.

Cut up the onion component first add a couple of tea spoons (or more if you like it strong) of vinegar and massage the vinegar into the onion then build the rest of the salad. The oil can be sprinkled on at the end before serving.

Adds a different dimension of flavour.

l to r Sherry Vinegar, Red Wine Vinegar, Flagon in progress.

Thursday, June 27, 2013

Another GM Crop - Green Manure

Another crop with the initials GM - Green Manure crops. Last year we ran out of Compost just when there were seedlings in need of planting. After an emergency team meeting out came the lawn mower with catcher and over to the nearest lush growth of clover. After digging this in thoroughly in went the annual bunching shallots. And what a bumper crop came out of that. The largest bulbs we have ever grown.

Now we are converts. This year at every opportunity we have planted a green manure crop. Oats, Rye, Woolly Pod Vetch and even tried an Autumn Mix from Eden Seeds.

Spoke recently to a nearby farmer who has been planting Green Manure crops since 1943 in the sandy Hunter River soil of his farm. He swears by it ability to turn sandy soil into rich dark loam and provide rich humus.

Chop it up well, dig it in but not too deep, keep it soft and fluffy so there is plenty of air. We use some hand hedge trimmers to cut it low to the ground and chop it up. Then fork it over and finally chop it again with a spade. You can leave it for while to break down but it works just as well if you plant immediately.

George Henderson in his book "The Farming Ladder" published in the 1940's talks about Green Manure crops and how he and his brother were able to restore dilapidated land quite quickly as well as maintain high yielding land. This is an inspirational book on farming and maintaining  diversified land. He raised cattle, maintained a dairy, kept sheep, pigs and chickens and a market garden. Because of the diversity he was never at the mercy of a single product's market fluctuations. The sad news was that his daughter took over when he retired and migrated the entire farm to pigs. In 2007 when pig prices fell and pig feed sky rocketed the farm went bust.

The book is available free from the Soil and Health Library.

Woolly Pod Vetch Green Manure Crop

Wednesday, June 26, 2013

Ice Cream


These are some things we know about ice-cream:
  • More milk means harder and more crystalline structure than those with more cream.
  • No egg whites (save (or freeze) those for your meringue or feed them to the dogs)
  • sugar controls softness
  • too much sugar won't freeze
  • too little sugar and it needs an axe to cut
  •  

We use this recipe (from the Sunbeam Ice-cream making Machine book) with excellent success:

4 egg yolks, raw

125g dextrose

200ml raw cream

200ml raw milk
 

Beat raw eggs and dextrose together until the eggs are pale. Then add the cream and milk and beat together using your electric mixer. You will have to stop the machine and, using a spatula, ensure all the thick egg/dextrose base is mixed in. Whip all this until it is fairly light and fluffy (a couple of minutes) . To hasten the final ice cream mixing stage, put this mixture, in its bowl, into the freezer for about 1.5 hours.
 

After this time has elapsed, set up your ice cream machine, get the mixture out of the freezer and whip it again using your electric mixer until it is light and fluffy. Then pour this mixture into your ice cream machine and churn.
 

Once it is finished churning, this will depend on how your machine works, pour straight into your container and freeze.

We have never had a problem using this method (we have a Sunbeam Ice Cream machine). We find this recipe makes a delicious rich ice cream. You can just add any flavourings or ingredients you want to this. We have added 1. honey and Cinnamon, 2. organic green tea powder, sometimes called Matcha and 3. pureed fruit...
 

This recipe is easier than the custard based recipe, it's richer, more delicious and has better texture than the custard based and is more nutritious because nothing is cooked. This recipe is so nice that you will have no problem sacrificing eggs although we tend to make it in the warmer months when eggs are more plentiful and a cold dessert is better appreciated.
Sunbeam Ice Cream Maker


Ice Cream in Progress


Green Tea on the left and Raspberry on the right

Chemicals in Agriculture


Recently we had the opportunity to inspect a commercial farm producing Pumpkins, seedless watermelons, corn and potatoes. The owners were generous with their time in showing us about the large scale production. So much equipment is required to prepare fields, maintain the crop, harvest, process and then store. What was very apparent though was the wide use of chemicals to ensure a viable crop.

Various types herbicides are used to keep down invasive grasses as no one herbicide was able to deal with all the weed types. Crops such as potato had to be sprayed with fungicide during the growing season. Stored harvested corn had to be fumigated with fungicide and insecticide.

Waste was part of the economy of efficiency. The quantity of dumped material from the potato sorter would have kept us in potatoes for a couple of years. The potatoes dumped were misshapen or over and under sized but completely edible. In the pumpkin field thousands of pumpkins were left to be rotary tilled back to the soil. The reason being it was the end of the season and there were insufficient quantities to justify bringing out the equipment to harvest the last late manurers.

I wonder if we really know the impact of what is sprayed on the food we eat and the land in which it grows. Maybe each individual item has a short half life or even little impact on its own on the consumer. But what is the effect on our bodies of a combination of different poisons. And if you are buying non organic produce this combination is fed to you at every meal. The best growers adhere to the withholding periods but is the product really completely clear of all traces of the chemical?
 
This was a strong reminder to us of why we try to grow all our own fruits and vegetables. It also encourages us to buy only organic products. 

Tuesday, June 25, 2013

Creamed Honey


Just opened a jar of our creamed honey. We had robbed the hive just before the hive went into decline. Only took a few frames and left the bulk for them. It yielded 6 KG which we creamed despite being told it can't be done in Summer. Creamed honey is nothing more than crystallised honey where the crystals are really fine. This provides a lovely mouth feel. We had a couple of jars from another robbing which had naturally crystallised with very fine crystals and kept this aside to use as seed material.

The process is simple, add some seed material to your batch of freshly robbed honey. I have heard you can use previously crystallised honey with large crystals by heating it gently until it is liquid again. I tried this but had no success. But that could be just me. The recommendation is 1 part seed to 10 parts honey. I have used less with success.

The stirring is the critical part. Not too fast otherwise air is incorporated and you get foaming. Just a gentle central vortex. We use a Squirrel mixer. These are available on the web in various sizes, we bought the smallest. Our drill press was set at a slow speed and we stirred for 30 minutes with 6 KG of honey. The beauty of using a drill press is that it can be setup and run without having to stand in attendance. A hand drill will work but it is difficult to maintain a slow speed. One experiment we tried was using different paddles in various types of electric mixers. The problem with all these was too much speed. They also have a tendency to overheat because of the viscosity of the honey. You may need longer for bigger batches or a bigger Squirrel Mixer.

The honey was then bottled in 1 KG jars and stored in a refrigerator at 7-18 C. The ideal temperature being 14 degrees C. Ours stayed in the refrigerator for 2 weeks. Once it had crystallised it stayed that way.


References:


Creamed honey's perfect caramel colour

The Australian Supplier of the Squirrel Mixer


The Magical Squirrel Mixer


Monday, June 24, 2013

Bee Notes from Club Meetings


Just some random notes from the monthly local amateur Bee club meetings which are interesting:

  • Worker bees have a lifespan of 6 weeks or less.
  • Re-queening should be done every 1-2 years to maintain strong and healthy hive.
  • Ask the queen supplier to mark the queen before they ship.
  • Don't use too much smoke when searching for the queen.
  • Queens run to a darker area when the hive is open.
  • When replacing the queen kill the old queen and leave the body in the hive and insert the new queen.
  • Check on the new queen after 2 weeks to make sure she is laying eggs
  • Queens are sometimes easier to find on the sunny side of the hive in the mornings and the cooler side in the afternoons.
  • Harvesting uncapped honey is not recommended as it candies quickly.
  • Paint hive lids brown in Winter to help the bees keep warm.
  • Clipping of half the queens wing will stop her from flying with the swarm and they will return home.
  • After collecting a swarm on foundation lock them up in a cool place for 24 hours to encourage them to draw out the comb and let them out in the afternoon.
  • Brood comb should be replaced progressively. Take out second frame from one side and 3rd frame from the other. Slide the outside frames in and insert two frames with foundation. Place the removed brood comb into the honey super.
  • Some bee keepers find that having half the base board covered in mesh gives best results.

Sunday, June 23, 2013

Cheese


We had to travel to Gloucester on Friday to pick up a part for our wood heater. It is only about 80 kilometres away and a pleasant drive usually except for the occasional driver who thinks the double unbroken lines in the middle of the road don't apply to them and that uphill blind corners are best for overtaking. This behaviour only seems to occur on this stretch of road. But with the appropriate caution the trip can be made safely.

Anyway the reason Gloucester is so important is that its contains a small country supermarket which carries the finest range of cheeses outside a metropolitan area and the cheeses are reasonably priced. There are not just Australian cheeses but samples from all over the world. This trip we picked up some tasting samples of Roquefort, Pecorino, soft creamy French Goat, Picante Provolone and a tasty Spanish Queso Manchego. With so much cheese at home it may seem crazy to buy more but how else do you compare your own efforts to the real thing. We've been playing with Provolone this week and is was important to fix a style in our heads. The other purchases were just because we couldn't help ourselves.

How annoying that most of the ones we really enjoy are based on sheep's milk. Just need to find a few lactating sheep. Can't be that hard can it. Some time ago we did find some organic sheep's milk in Tasmania but they wanted $15/litre plus $100 freight.

Maybe this will just have to stay a dream.


Samples for testing Tasting


Our Provolone Test Run

Lola


Acquired another mouth to feed a few weeks back. This female Magpie started feeding out of a food dish we keep topped up for the two fowls who reside in the house yard. Gradually over time we improved her diet with some fresh mince. Now she rocks up at first light for her first feed and then a few more times during the day. Oddly she is a lone bird and is chased off by a family of three who live in this area. Still she persists and returns. I'm not sure why she allows them to chase her away because she is twice their size. For some reason she has been named Lola. Naturally feeding has to take place to the sounds of Eric Clapton's fine song “Layla”.

Lola at 7.30 am waiting for her first feed

Saturday, June 22, 2013

Vineyard Pruning


That time of year again. Started pruning in the Vineyard as all the leaves have dropped. The table grape vines around the house are still covered in leaves probably because of the heat generated around the house. Only a few of the orchard trees have dropped which means we can prune a few things at a time spinning out the workload.

After pruning the vineyard we will try grafting (again). There are some Isabella vines which are unsuitable for wine making and every year an attempt has been made to graft Chambourcin to Isabella rootstock. Having tried two grafting methods both have had a success rate of about 1%. So there is a technique here that we have definitely not mastered.

During vintage we noticed at a commercial vineyard that whole sections had been grafted successfully. Some inquiries added some additional knowledge which will be incorporated into our technique. The main piece of knowledge was when bud grafting leave some original buds which will burst and provide life to the vine until the new graft has taken. The original buds need to be trimmed so they don't get out of hand. We'll see how we go. We haven’t try top grafting before so maybe that is another experiment. The few successful grafts are very vigorous.

Our vineyard has a rock platform about 600 mm bellow the ground and the roots grow sideways not down. They say to make good wine you need to stress grape vines, well these get really stressed especially if there is a dry spell. Fortunately we have access to plenty of dam water.


Friday, June 21, 2013

Cell Grazing


Our casual job is keeping an eye on an 80 acre property across the river about 8 kilometres away. The owner lives in Sydney and comes up at weekends. During the week cattle have to be moved most days and various other chores completed. Fortunately we are allowed to job share. The work load various from season to season and from day to day. Sometimes no urgent work is required and a day off is appreciated. Sometimes one hour and other times up to a day if a new fencing run is to be finished. Anything from 40 hours to 100 hours each month split amongst two. For us this is an ideal arrangement. Sometimes we work together and other times only one has to attend.

One of the benefits of Cell Grazing is that each cattle movement defines a bracket of work. After each move the paddock is harrowed and sometimes slashed. Because the cells are small the workload is small. Occasionally we will trim the grass under the electric fence. In a one hectare cell this is quick. Previous owners would spray Glyphosate under the fence resulting in woody weeds growing rather that grass. Now with the trimming, grass grows and the cows trim under the fence line leaving us to perform a once a year clean up.

During calving the small cells assist in making checking progress easier. Calving girls stand out i.e. usually off in one corner of a cell. Once the cow and calf have bonded we slip them into the cell ahead so that the new mothers are always getting the best feed one cell ahead. A lot of care is taken to ensure that the new mother doesn't have access to too much green feed for the first few days as they are coming of a restricted diet leading up to calving. The restricted feed regime is fewer cell movements and greater access to hay or silage in the last month or two of gestation. Managing the feed intake has aided in fewer calving issues.


Setaria Grass Cell in Autumn

Thursday, June 20, 2013

Bee Keeping


We having been keeping bees for more than 20 years. Anything from 1-5 hives at any one time. However two years ago we lost all three of our hives to Small Hive Beetle infestation. To be fair our lack of attention was the contributing factor with SHB being the instrument of their demise.

After losing the hives it was decided to raise our skill level by joining the local amateur bee keepers association. This has been a wonderful experience. The club has 20 plus hives in the apiary and each month there is an opportunity to work with knowledgeable people and gain hands on experience. There is even a mentoring program and plenty of experienced people to contact for advice.
 
Last year we acquired a nucleus through the club and commenced bee-keeping again. However during the fortnightly inspections in Summer we noticed the brood numbers diminishing steadily until the hive ran out of bees. At first the thought was that the queen had died but eventually with some research it was discovered that the lack of pollen had suspended egg laying. As it turned out a few hives in the club apiary suffered a similar fate. Had we known earlier (lack of experience) it may have been possible to relocate the hive to a pollen rich area. Or last resort feed pollen.

The reasons for only getting one hive was multi fold. 1) We didn't need that much honey. 2) One hive was plenty for pollination in our orchard and garden. 3) One hive would make the bee keeping task more manageable and we could spend more time observing and inspecting.

Well all that was wrong. At a recent club meeting an experienced retired apiarist said that you need at least 3 hives and 5 would be better. By having comparison hives it is easier to see if the problem is queen related, hive related or general conditions related. With multiple hives it is possible to create a replacement if one is lost or in bad times combine a weak hive into a stronger hive to save it. And finally the managing of multiple hives increases the skill level.
 
So we wait until Spring and start again.


One hive stand, no Bees

Wednesday, June 19, 2013

Feeding Grain to Cattle


When we first moved south to our current property there was a drought and hand feeding the few cattle we brought with us became a priority. As well as roughage we wanted to feed something that would provide protein and vitamins and minerals. Feeding un-cracked grain was out of the question and cracked grain was so wasteful. Grain itself is not a normal part of the bovine diet. Somewhere in our reading we had come across the value of sprouted grain. The most value was received when the sprout has just emerged. Not only in terms of vitamins but it also means the cattle aren’t at risk of bloating.

The grain is put in a bucket and covered with water for 24 hours. It is then poured into a large colander for draining for the next 24 hours and in warmer weather this might be less. The little tiny emerging sprout is the signal that it is ready for feeding out, The cattle loved it. We were careful to only feed out small quantities in the first week and then gradually increased the volume. They thrived. They thrived during that period.

Large Colanders with bottle for size

Tuesday, June 18, 2013

Raw Milk Cheeses


Recently been rereading a research article on raw milk cheeses published by Institut National de La Recherche Agronomique. Authored by E. Beuvier and S. Buchin.

Firstly the hygienic aspects : Overall dairy products have a very good safety record accounting for only about 5% of bacterial outbreaks in France and 1-5% in six other countries (USA, Finland, The Netherlands, England and Wales, Germany and Poland) between 1988 and 1997. Raw and Pasteurised cheeses each accounted for 30% of that 1-5%. Interestingly E. Coli and Salmonella die slowly during the maturation of hard cheeses. The USA legislates that raw milk cheeses mature for at least 60 days.

Secondly the sensory aspects: Raw milk cheeses ripen faster and develop a stronger odour/flavour.

Besides the intensity of flavour, differences in the flavour profile of cheese can observed. The flavour of ripened cheese is richer and more complex when indigenous microflora is present in the milk to be processed.”

In almost all comparison studies raw milk cheeses received a higher score for pungent attribute.

It is really a personal choice whether to use pasteurised or raw milk. Quite often availability dictates that choice. For us it's a belief that the food we consume should be as little interfered with as possible.

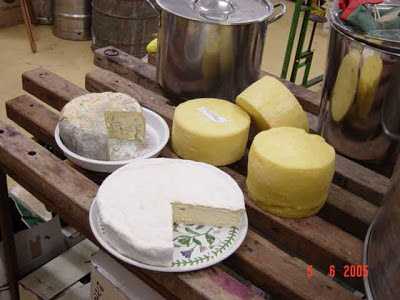
Gorgonzola, Brie, Parmesan and Cheddar at Home Hill Farm

Monday, June 17, 2013

Jack


When the same thought pops into your mind on a regular basis even years after the event it may be time to put it in writing. Maybe that will clear the head or at least it will honour the memory.

One feature of every dairy farm is the farm dog or in most cases the farm dogs. Usually two if not more. To be fair all will get a mention although this tome is really about Jack for a very good reason. Anyway what happens is when you want to go milking all the dogs have to be let off the their leads so they can follow you or hop up on the quad for a lift to the dairy.

Well there was Jim a kelpie cross who was somewhere between 12 and 15, arthritic but would still wander the kilometre and half up to the dairy on his own because he was too old to jump onto the quad. He seemed to make a particular effort to get there after a new calf was born. Apparently the after birth is a particular delicacy but being a vegetarian I haven't tried it. Jim was semi retired but on a warm day would help muster.

Betty was a Border Collie, a bit deaf, a bit blind and probably had one too many kicks to the head. She would stay around the house except for one time when she came up to the dairy and mustered the herd with everyone else as if it was the normal thing. She only ever did it once and probably just to show me she could.

Then there was the new lead dog Sam. A good natured kelpie cross who only bit me twice when I tried to move his food bowl out of the kennel. I waited until he was out of the kennel for the third attempt. Always keen to catch a ride Sam rarely ran if there was a lift available. He unfortunately had a bad habit of disappearing when the irrigation was in use. I don't know how he got the energy to jump at the water stream for so long but 2-3 hours was the usual. Other than that habit he was reasonably reliable with a little selective hearing.

Jesse was only a baby sitting job for a neighbour across the river who was away but ended up staying permanently. She was the boss's favourite. A kelpie with perfect markings, lots of energy, always wanting to please. ran all the time, ate nothing, skinny and was the bantam version of a kelpie, so small you could fit her in your pocket.

Jack came along as Jim's replacement from a local dog pound. A very typical kelpie in markings except small in stature. Jack never rode if he could run. From the moment you released his straining body from the lead he was off jumping like he was on four pogo sticks. Then off to the dairy, not along the road but through the paddocks with his head dipping just slightly as he scooted under the bottom barbed wire. At the the dairy he was waiting as the rest of us arrived on the quad. Small, skinny with a constant grin Jack was born to run and he always did. Not too bad as a cattle dog but just too much energy to be really good. But a happier dog you couldn't get.

And then one morning Jack clipped the side of a corrugated iron sheet with one leg and bled. I got the phone call at 5.30am asking if I could come over and take over milking while the dairy farmer took him to the vet clinic. Jack wasn't very big and so a lot of blood was really a lot of blood. By the time the vet got to him there was nothing that could be done. He had lost so much blood they couldn't find a vein to put him down and an injection into the heart was all that could be done. And all through this Jack just had that big happy open mouth grin and wagging tail. It became impossible to forget Jack because he was so young, so happy and so full of energy.


Sam and Jack working the irrigation

Sunday, June 16, 2013

Manure and Relief Milking


It has been a year since our relief milking job finished and the dairy farmer sold the herd and retired to beef cattle production. The 100+ girls were shipped in multiple B double loads to the South Coast and a new life. A new life also commenced for the relief milker who took some time to get used to sleeping in on Sundays. Although it wasn't always just Sundays but several times a year the farmer needed his week or two holiday or once a month there was the mid week golfing game or a Saturday early game.

Seven years builds a routine into the body and change was slow to come. In many ways this rhythm of this life is a sad passing. Rising at 4am to be at the dairy by 5 to set up before driving down to the flats to wake the girls. A quick spin around the Springer paddock to see if there are any new mums. A wet bundle on the ground with steam rising from it as mum vigorously licks. Wait and watch to ensure the wobbly bundle gets to its feet and has that first nourishing drink. Gender and tag number are noted and congratulations are given and on to the main task.

There was something special about watching the girls stroll up the rise to the dairy sometimes in the lights of the quad other times the Summer sun not quite poking over the horizon. Also something special when the first Autumn mists shrouded the herd. The bovine warmth in the pit as cups were afixed, the large dark eyes looking down at you as they filed into the line for their fix of grain while milked. Something special as the last girl left the dairy and you climb out to see the sun coming up. The day just starting and you have just finished work.

Every week or two a trailer load of manure would be brought home to be used around our farm in various ways. Nearly a ton of manure took only minutes to load using one of the dairy farm's big tractors with a front end loader. The manure automatically lodged in the effluent pit after washout each milking.

Over the years the manure was used in various ways. Every few years a barrow load or two went around each fruit tree and then covered in weed mat to protect against removal by the chooks. A dozen loads would go into the concrete block enclosure to break down and be used in the Spring planting of the tomatoes. And some would be used to beef up the composts made with chipped Winter prunings.

All that has now changed. After our cattle are moved into a fresh paddock each week we go around with old feed bags and collect each pat by hand. So back to the basics once more.

Packing them into the Dairy Yard


Autumn

Milking Over

The last load and the end of dairying

Saturday, June 15, 2013

Jocasta Innes


Only recently we became aware that Jocasta Innes had died in April of this year. She has particular significance to both of us as a result of her book “The Country Kitchen”. This was the first text which led us to embark towards a different lifestyle, one where our lives began to revolve around growing food, cooking and moving closer to a simpler life style.

As we progressed we accumulated works by other writers but invariably returned to her guide frequently for ideas and for inspiration, re-reading it from cover to cover again and again. For some reason this invigorates and energises us. Maybe we are just aging Pseudo Hippies longing for the 70's.

An important quotes from her..
Nostalgia for the sake of nostalgia has been avoided because gadgets do save time and effort if you can afford them. After all, it is the flavour of your sausage filling that counts, not whether it was pushed into the casing mechanically or by human hand.”

So … make use of the time and energy saved by modern appliances to rediscover the culinary skills known to [our] forebears”

This was particularly memorable after an attempt to build a Welsh Dresser with only hand tools. From that painful exercise arose a well equipped workshop and kitchen. With so much to do it is compulsory to maximise the day. And we are all fortunate that these appliances and tools are readily available in the marketplace both new and second-hand.


Friday, June 14, 2013

Camembert and Roquefort


Camembert is relatively easy to make. Said after ten years experience and a fair share of mistakes and failures. But after a while you get into a groove and it becomes second nature. The important thing is to keep trying and take notes on each cheese. Each cheese we make has a Cheese Making Note that stays on the Cheese refrigerator until the cheese is consumed. Any special useful changes are added to the cheese making book as margin notes e.g. length of brining on small Camembert rounds. We use the Cheeselinks book for most of our cheeses and both the Normandy Camembert and Brie recipes make excellent small rounds.
Roquefort is a different matter. Having found real Roquefort in a small supermarket in nearby Gloucester NSW it became an imperative to attempt to replicate the texture and flavour. The initial challenge was not having Sheep's milk. Raw cow's milk was the only option. The research indicated that a higher fat level was required and this was achieved by adding back cream skimmed from a larger quantity of milk. All the other processes such as starters, timings for each stage, salting and aging were accumulated from various cheese books and then the experimenting started.
The end result is a very creamy, bluey cheese which is nothing like Roquefort in texture and flavour. However what has resulted is a great blue which has now become a staple. The experimentation will continue but without Sheep's milk we can only dream.


Camembert in its Humidifier

Roquefort in Cheese Wrap stored on edge to allow maximum airflow through holes
 

Partially Aged Roqufort


Roquefort Recipe

% Moisture 42.44 % Fat 29 % Protein 20 % Salt 4.1
Temperature 30 C pH 6.5

Cheeselinks Cultures B&C i.e. Lactococcus Lactis, Lactococcus Cremoris, Leuconostoc, Streptococcus Thermopilus, Lactobacillus Delbreukii Bulgaricus

Rennet 5 ml/20 L
Set for 2-2 1/2 hours
Curd cut 1-3 cm
Stir 2-5 times over 40-60 mins
Drain to Curd depth and fill hoops
No Pressing
Drain 2-3 days turning regularly
Dry Salt 4.1% of Curd weight
Ripen at 8- 10 C for 18-25 days
Pierce holes
Wrap
Stack on sides
5-10 months at 1 C (or 8-10 C for quicker ripening)

Cheese Refrigerator - Bottom Shelves: Haloumi and Fetta, Middle Shelves: Camembert and Roquefort in Humidifiers, Top Shelf: Cheddars and  Havarti, Door: Parmesans.

Thursday, June 13, 2013

Bio Char

Our Wood Heater yields a bucket of ash and charcoal every morning We've been keeping it and building up a stockpile until the end of the cold season. Initially it's scooped into a steel bucket and later when cool stored in feed bags. Once the warmer weather has arrived the Chipper/Mulcher is relocated away from the house and all the collected ash and charcoal is fed into the Chipper/Mulcher. A large feed back is used to catch the fine material. We wear a face mask when operating for this process because the dust is fine and prolific. All the collected material is stored in a plastic drum and used liberally on the vegetable garden and especially when building the NZ Compost. Our wood heater yielded almost 200 litres of material last cold season.

Charcoal in the Fireplace

Charcoal Cooled and Bagged

Mulched Ash

Wednesday, June 12, 2013

Weed Disposal


Sometimes there are weeds you would rather not put into the compost or you don't have the making of a hot compost such as the NZ compost. We have a couple of containers around the garden to store these (in water) so that they break down and seeds become lose viability.

Plastic 200 litre drum

Stainless Steel Cylinder aka Mr Squiggles Space Ship